


Get this design on other amazing products


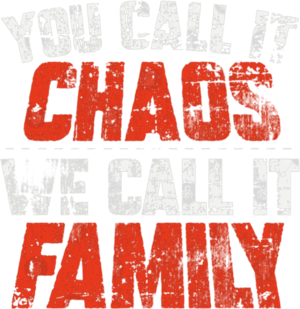
KidSuper’s Colm You call it chaos we call it family shirt. Dillane has raised $500,000 for Black Lives Matter through a capsule collection of T-shirts printed with the names and faces of people killed by police in recent years. (He also made face masks that read “speak up” and hoodies with this message on the back: “If you want to change the system, speak up, white silence is pro racism.” Dillane is hoping to hit the $1 million mark this week. The graphic does not include everyone who was wrongfully murdered by the police, and there are many that have gone unnoticed,” he tells Vogue
You call it chaos we call it family shirt, hoodie, sweater, longsleeve and ladies t-shirt
 (Guy Tee)
 (Ladies Tee)
 (Longsleeve Tee)
 (Sweattshirt)
 (Hoodie Tee)
o turn off the layer you’re not using, simply click the ‘eye’ button on that layer You call it chaos we call it family shirt. This leaves you with just the one layer to work and experiment with. Now, if you’re intending to control the light, dark and mid-tone areas, you’ll need to use the Level feature. Go to Image in the top menu bar, choose Adjustments and then click Levels. This will open up a panel that allows you to focus on light, dark and mid-tone sliders. As you move the sliders, the open layer will show you the differences in real time. This makes it super easy to separate the tones and prepare for print. Let’s assume that the image we are using has high darks and lights, but everything in between these tones is quite unbalanced. The first step to balancing out these tones is to set the slides at the point where the shades just about begin to ‘ramp up’. Once you’ve done this, it’s time to focus on the middle slider. Try moving the slider towards the left and leave it at the point where the color, once again, just about begins to ‘ramp up’. This is really about balancing things out to the point that your eye notices it – and, when you’re happy, simply click on the ‘eye’ button and you’ll be able to see the huge improvement you’ve made.Don’t just use your first result, however. Be sure to keep toggling the layer on and off so you can continually compare the two images. Gradually move the levels back down from the original point you changed them to, and comparing regularly, find a point that is the perfect balance between the original and the improved layer.
You Can See More Product: https://bestteestore.net/product-category/trending/